TikTok made me try it: DIY Plaster Art
My for you page has been full of DIY artwork recently. I will scroll home renovation pages for hours on end, so I think my algorithm has been programmed to share home content with me…no complaints.
The DIY that really stood out to me was plaster art. There are so many different renditions ranging from abstract to fabric art using plaster and every video made the process seem relatively simple and inexpensive: get a canvas, buy some plaster, have fun, and voila! I can confirm that plaster art can be a beginner’s project for simple home art, but the process was not as quick and painless as I originally thought.
What is plaster art?
If you’re confused about what I’m even talking about, then I’ll start by sharing some examples and the inspiration behind this project.
Moving into a new apartment with high ceilings, I knew that art would be an important piece of making the place warm and inviting. Being a creative at heart and having plenty of time on my hands before starting to work full-time, I decided to give DIY art a try. How hard could it be?
My initial inspiration came from TikToks where people showed themselves creating DIY plaster art pieces. Here are some examples:
DISCLAIMER: I do not own the footage in any TikTok shown. All credit goes to the original poster.
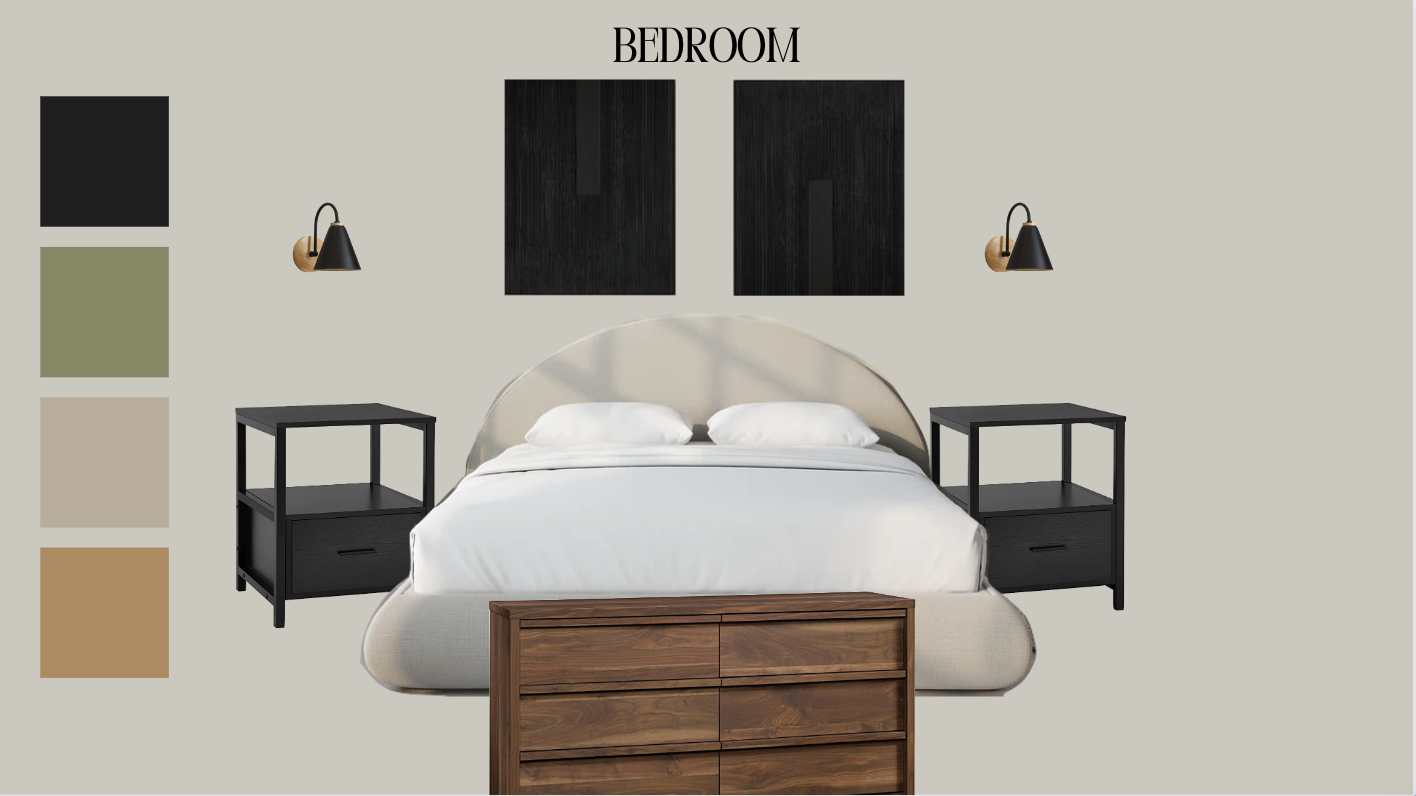
When it came to figuring out what I wanted to do I found inspiration from Etsy. I scrolled through pages and pages of artwork listings until I found something that matched my vision and I felt I could successfully create on my own.
Etsy Black Plaster Art Listings
With inspo pictures ready and at least an hour of TikTok research, I was ready to attempt my own plaster art. If you want to see the results and process I used to make my own plaster artwork, keep reading.
Difficulty: EASY
Time: 2-3 DAYS
What do I need to make DIY plaster art?
There isn’t a long laundry list of things you’ll need for this project and luckily, many of the items can be found at a local craft store, hardware store, and amazon.
Tools
- Canvas
- Plaster/Joint Compound
- Puddy Knife
- Cake decorating texture tools
Optional
- Acrylic paint
- Paint brushes
- Tape
I’ll talk through where I got each of my items below, but if you want to skip ahead to directions feel free skip ahead to the instructions section.
Canvas
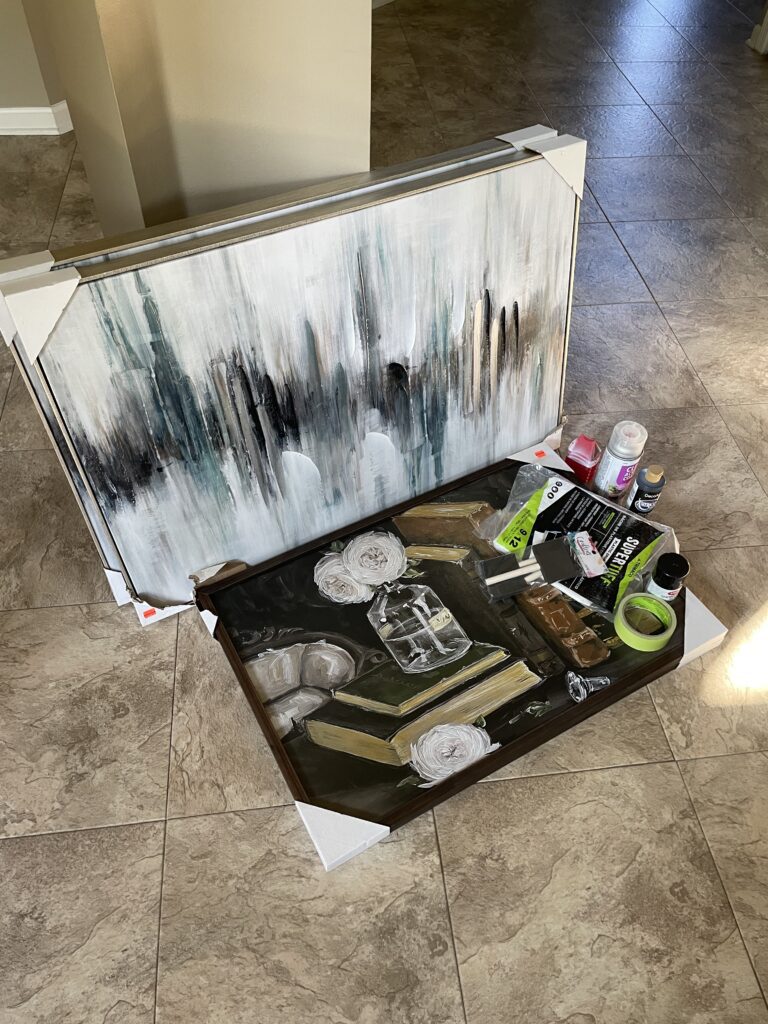
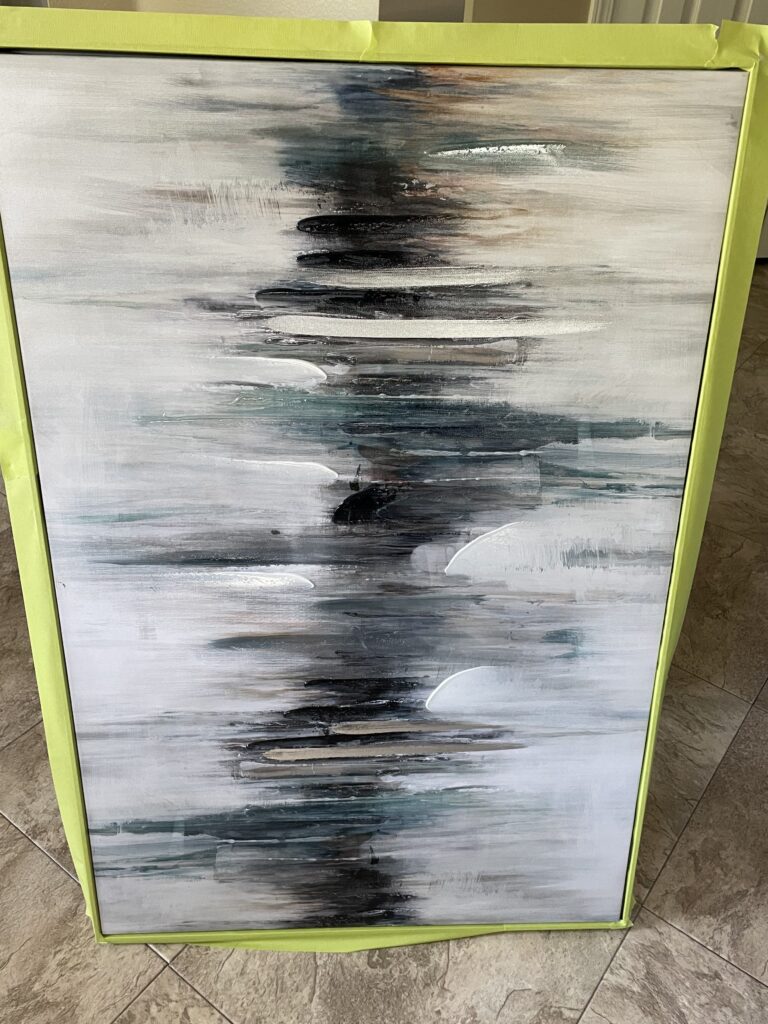
The week I decided I wanted to start art projects just happened to be a 50% artwork sale at Hobby Lobby. Places like a thrift store, goodwill, and Hobby Lobby are good to start if you’re looking to remodel a current art piece.
I opted to pick up framed canvases from Hobby Lobby because I personally preferred having framed edges versus the canvas edges. Don’t worry the pieces I picked up were damaged, so bringing new life to them isn’t as much of a crime.
Plaster/Joint compound
The obvious next most important item is plaster. I originally used plaster and found the texture to be extremely crumbly and difficult to spread on the canvas.
I’ll mention more later, but I was able to achieve almost identical results and I had a more seamless experience on the second canvas when I used joint compound. Not to mention, the joint compound was more material for the same cost.
Putty knife
Simply for spreading the plaster on the canvas. This makes it super easy to get a base layer of plaster that you can then go back and add texture and details to later. Plaster doesn’t dry too fast, but when working against the clock a tool like this can help with speed and organization.
Cake decorating texture tools
To get the lines on the canvas I used cake texture tools. They’re super inexpensive and get the job done. I wasn’t too concerned with ruining my materials because I didn’t plan on using them again, but the plaster easily could be scraped off the tools and they could be salvaged…not for cake baking of course.
Acrylic paint
If you’re planning to leave the plaster white the next tools are unnecessary, but I liked how my inspo pictures were painted black. I felt like that would fit the modern and organic feel I was going for so I used black acrylic paint.
I’m sure you could also use spray paint, but I was worried about 1. ruining my frame, and 2. I originally planned to only partially paint the canvas.
Paint brushes
No surprise here. Where there’s paint, paint brushes are likely to follow. I made sure to use ones with bristles and not foam because I knew there’d be some tight spots I’d have to squeeze paint into.
That being said, if you have a rather large canvas, you’ll want a few larger brushes to reduce the amount of time you have to spend painting.
Tape
I used tape to cover the frames of my canvases. I didn’t want to have to scrape off plaster or accidentally get paint on the frames so this was just an extra step to provide some (much needed) protection later in the process.
Instructions
DAY 1
- Tape the edges of the frame to prevent plaster and paint from ruining the frame.
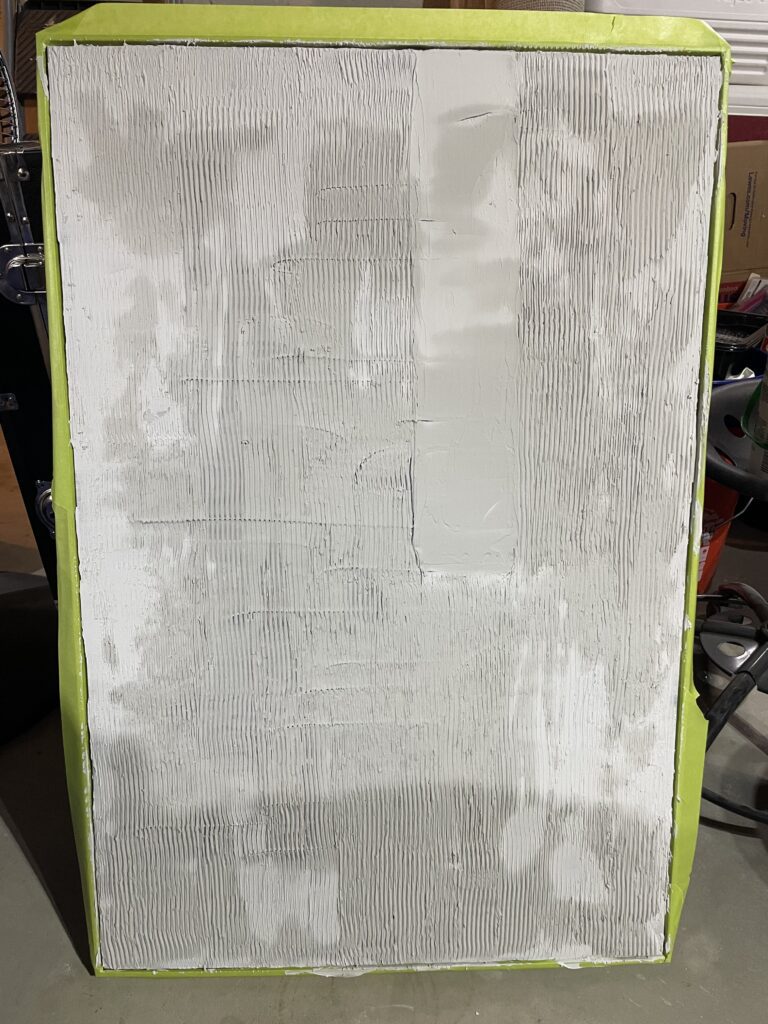
- Use the putty knife to spread plaster across the canvas until the original image is completely covered. The plaster layer does not need to be completely smooth.
- Use the cake texture tools to create the texture pattern. For my design, I made vertical lines down the length of the entire canvas.
- Once the vertical lines are set, I used a straight cake tool to smooth out the plaster until half way down the canvas following the same path as the vertical lines.
- Wipe off the putty knife and use it to remove excess plaster from the crevasse between the canvas and the frame.
- Allow the canvas to dry for 24 hours at minimum.
At this point you’re ready to clean up after day 1! You won’t want to rinse large amounts of plaster down the sink drain so remove as much as possible from your tools using paper towel and dispose in the garbage. Rinse any excess in the sink, or use a wet paper towel to remove.
For more home decor ideas, check out these posts!
- 17 Autumn Home Decor Ideas to Make Your Home Cozy
- Google Hack to Find the Perfect Piece of Furniture
DAY 2
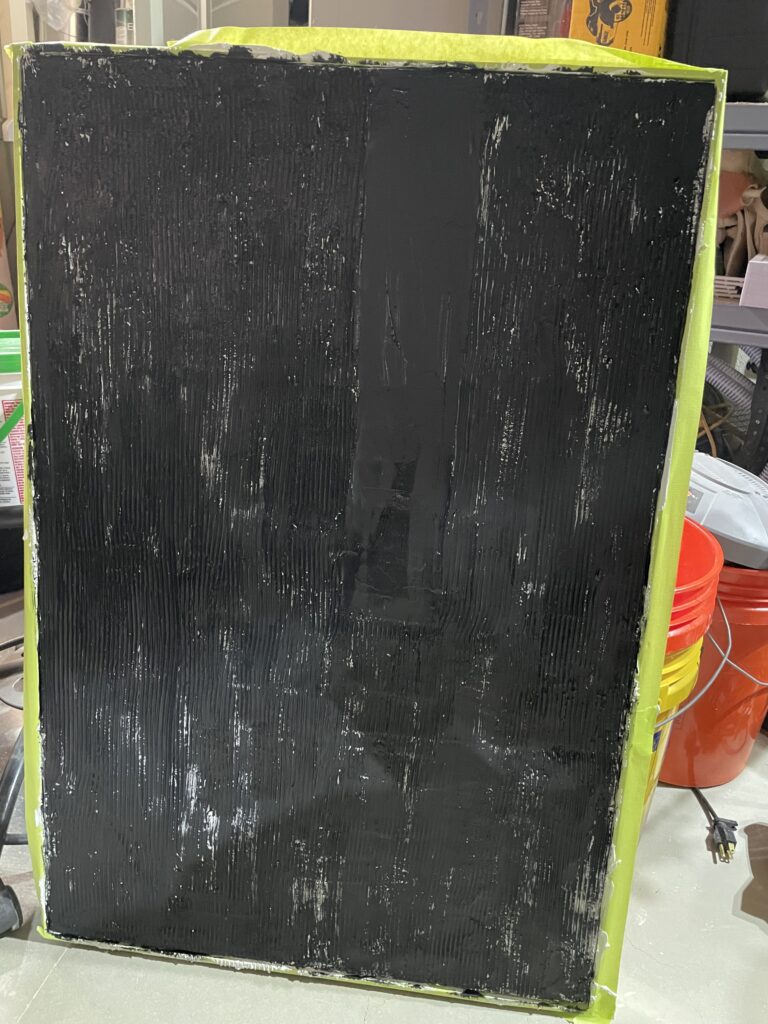
- Paint the first coat of black paint on the canvas using a large paint brush. After one coat my canvas looked like this:

2. Allow 30 mins to 1 hour of dry time.
3. Paint the second coat of black paint on the canvas using a large paint brush.
4. Using a smaller paint brush, get the small details and remaining white plaster spots.
5. Once dry, remove the tape from the frame. Don’t be alarmed if plaster around the edges comes off or if paint gets chipped, the nice thing about texture art is that it’s not supposed to be perfect!
NOTE: If removing the tape caused lots of plaster dust to accumulate, take a little bit of time to remove the dust. You can for the most part dust it off with a household duster, handheld vacuum, or even lightly blowing on the spots yourself.
6. retouch-up the black paint for any areas that may have chipped
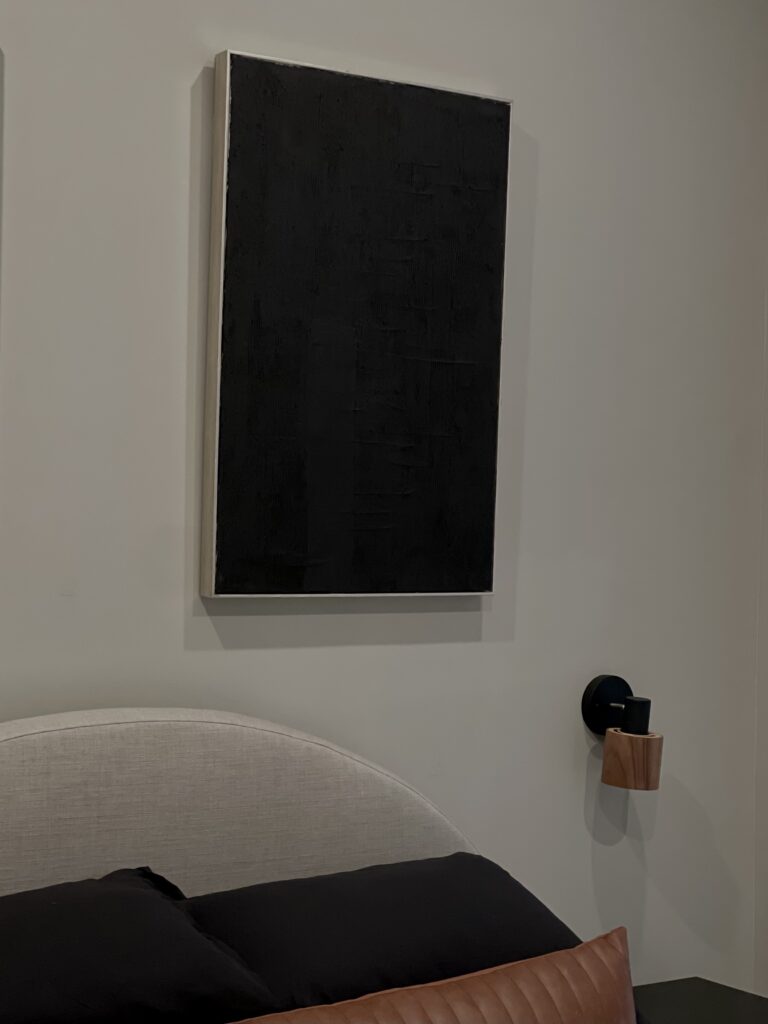
ALL DONE!
Like I said, the process isn’t very challenging just more tedious. I didn’t think I’d spend so much time bent over a canvas and to be honest a massage doesn’t sound too bad. That being said, I think the value of the artwork and how it turned out was definitely worth the time considering how much money was saved.
Final Thoughts
Was this more challenging than I anticipated? Yes and no. This project is definitely something that anyone with any level of creative experience can try, but it was more of a process than the short TikTok clips let on. Was this because I painted the canvas? Absolutely, so that’s something to think about.
Either way, I’m more than happy with how this project turned out and it makes me excited and confident to continue trying DIYs in the future.
How much does DIY plaster art cost?
All in all this project cost me about $80. For two 24in x 36in framed art pieces that would probably have cost me 3-4 times that amount to pay for. Considering the cost of one piece of art this size could start at $100 I was impressed with the cost. I also think there’s something special about having artwork that’s unique to you in your space even if it’s because you made it yourself.
Leave a comment down below for what DIY decor I should try next!


Home – Simple Growth Blog